
Crafting Data Magic: Building A Simple Web Application with Snowflake

Notional Architecture (Source: www.snowflake.com)
Traditionally, building a full-stack application required developers to juggle multiple technologies and infrastructure components. It was like spinning plates while juggling knives! But Snowflake has made it super easy to build full-stack applications with its cloud-based data warehousing platform.
With Snowflake, developers can store, analyze, and share data without the need for complex infrastructure management. Think of Snowflake as your virtual genie that makes all your data wishes come true!
Snowflake is super easy to set up and use. In fact, creating an account is as easy as signing up for your favourite social media platform. Once you’re in, you can connect to your data sources and start building your applications. And the best part? You don’t need to be a tech wizard to use it. For this little project we are going to do, a free edition account will suffice.
Snowflake’s cloud-based infrastructure provides automatic scalability and security features, making it easy for developers to manage large amounts of data and ensure the safety and privacy of their users’ information. So, you can relax knowing that your data is in good hands.
Snowflake has simplified data management by allowing developers to store and manage data in a simple and efficient way. You can create tables and views and run complex queries to analyze your data. It’s like having your own personal data butler.
Snowflake also integrates easily with other data tools and services, making it easy for developers to connect to their data sources and use snowflake as part of their existing data workflows. It’s like snowflake speaks the same language as your other data tools, and they all get along like a house on fire.
In this exciting blog post, I am thrilled to guide you through the process of creating a robust web application utilizing the power of Snowflake, GitHub, Python, and Streamlit. By following the step-by-step instructions I provide, you'll have the opportunity to gain hands-on experience and build your very own web application alongside me.
Requirements:
A non-personal Gmail account
Github account
Streamlit
Snowflake account
First step is to set up a GitHub repo. For your convenience, I have included images for easy understanding.

Image 1: Snapshot of creating a repository
Now create a new file in the repository (Reference Image 2)

Image 2: Snapshot of creating a python file
Now go to Streamlit app (https://streamlit.io/) and sign in using your Github. Give access and authorize Streamlit. Go the workspace and click “New app”. Select the repository and the file created earlier. It should look something like this (Reference Image 3), and then click deploy.

Image 3: Snapshot of app deploy in streamlit
The development process will involve cycles where you initiate by navigating to the Github tab, locate the python file, and select the file name. Enter certain code in the python file and save it by committing the changes (Reference Image 4)

Image 4: Snapshot of committing changes in Github
After committing these changes, go back to Streamlit app and see (Reference Image 5)

Image5: Snapshot of streamlit app with header
Given that the process of modifying and reviewing changes is iterative, it may become tedious to illustrate every single step in the process. Consequently, I will present only the code alterations made and the expected outcomes, which will provide a concise yet comprehensive representation of the process.
Now the next step is to create a customer input from using google forms (Reference Image 6).

Image 6: Snapshot of accessing google forms
Type any values for the title and description.
Create some yes/no type of questions and questions with several answers that are short phrases. Once done, click the eye to preview the form. It should look something Image 7.

Image 7: Snapshot of questions in google forms
To ensure that the form is functioning correctly and capturing accurate data, I recommend submitting the form multiple times while making changes to the answers. Return to the editing tab of the form and see the survey results (Reference Image 8).

Image 8: Snapshot of survey results in google form
Link the results to the spreadsheet as we need the data generated (Reference Image 9).
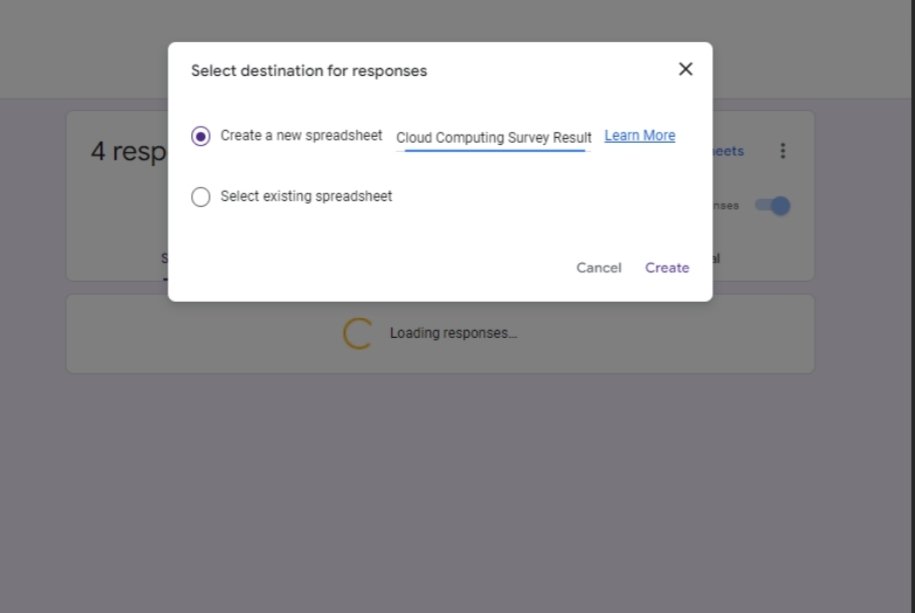
Image 9: Snapshot of creating a spreadsheet of survey
You can add more data by going back to the preview tab. Responses will automatically stay updated in the form page and the spreadsheet. You can see a “GUID” in the google sheet page in url. Keep that handy as we might need it later. Now go to the Snowflake account, click on admin, partner connect, data integration tools and search Rivery (Reference Image 10).

Image 10: Snapshot of finding Rivery
Rivery automatically creates the objects to establish a connection. Click on Connect.
Now you might wonder what Rivery is and why exactly are we using it here?
With Rivery, you can extract data from various sources and transform it into a format that is compatible with Snowflake, without having to write complex code or perform manual data mapping. This helps to speed up the data integration process, reduce errors, and ensure that your data is accurate and up to date.
Additionally, Rivery offers several features that make it an attractive option for businesses, such as data validation, scheduling, and monitoring capabilities. It also provides a single dashboard that allows you to track your data pipelines and manage your integrations efficiently.
Now, let’s go back to the tool.
To get to the connections screen, just click on “Connections” in the side menu. As part of the partner connect process flow, you’ll need to set up a connection to Snowflake. If everything goes well, you’ll receive a “Test Connection Passed!” message indicating that the connection has been established successfully. This means you’re ready to proceed with your data integration efforts.
Go to the Snowflake account page, create a database and name it maybe “cloud_db”. To this database, add a pc_rivery role and grant create schema and usage privileges.
Add the role to public schema and grant all the necessary privileges like “create table”, “create pipe” etc (Reference Image 11).

Image 11: Snapshot of db created and relevant privileges
Next step is to create a google sheets connection in Rivery (Reference Image 12).

Image 12: Snapshot of finding “google sheets” connection in Rivery
Type in the connection name and sign in with google account you used to create the form earlier. Allow access (Reference Image 13).

Image 13: Snapshot of allowing access to Gmail in Rivery
Once done, save the connection and test it. It should pass (Reference Image 14).
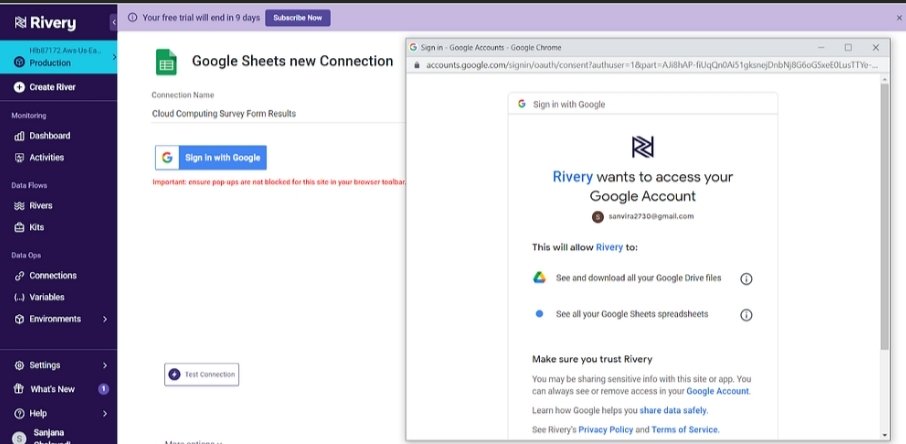
Image 14: Snapshot of connection pass
If you go back to connections list, you should be able to see the snowflake and a google sheet connection.
Next step is to create a river to move the data. There are different types of rivers in Snowflake but for this little project, we will use “Source to Target River” because we need to get the google sheets data to our database “cloud_db” (Reference Image 15).

Image 15: Snapshot of data pipelines
Search for google sheets and click that. The source connection list will automatically load and click the one we create earlier. Type in the saved GUID mentioned earlier (Reference Image 16).

Image 16: Snapshot of source details
Go to the target and select the database and schema. Name the table (Reference Image 17)

Image 17: Snapshot of target details
Choose append only in loading mode so whenever new data is created, the table will get updated. Go to the schema section now and click auto mapping. You should be able to see all the form columns there (Reference Image 18)
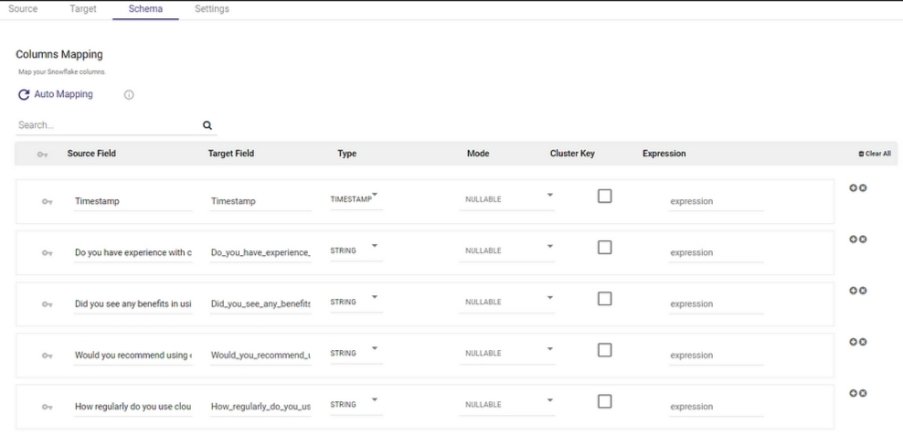
Image 18: Snapshot of schema details
Rename the columns if needed (Reference Image 19).

Image 19: Snapshot of schema details after column renaming
Now save and run the river. In the activities section, you should be able to see if the river was successful or not. If you followed all the steps above, it should be work. Don't forget to rename the river (Reference Image 20)
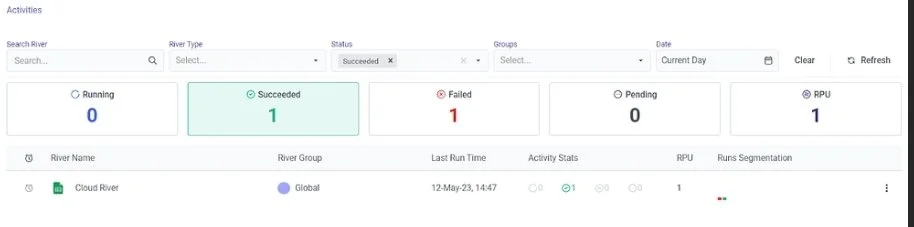
Image 20: Snapshot of activities
Now, if you go back to Snowflake, you can view the data in the Rivery table (Reference Images 21 & 22)

Image 21: Snapshot of table in database

Image 22: Snapshot of table preview in database
Notice the sample data created through the forms. Go back to the form and generate more responses. You should be able to see new data again (Reference Image 23).

Image 23: Snapshot of updated table preview in database
Go back to the Github repository and add the requirements.txt file. We are basically setting up Streamlit to work with Snowflake (Reference Image 24).

Image 24: Snapshot of requirements file in Github
Go to your Streamlit app settings, secrets. Enter the following by replacing it with your information.
[snowflake]
user = “******”
password = “******”
account = “******”
warehouse = “******”
database = “*****”
schema = “*****”
role = “******”
Now, to display the table (form), we should query the data. In the Streamlit python file, enter the following code. It will connect to Snowflake and print the table in the app.
# Modified from Johannes Rieke’s example code
# Import required libraries
import streamlit
import pandas as pd
import snowflake.connector
streamlit.title(‘Cloud Computing Form Table’)
#connects to the database
my_cnx = snowflake.connector.connect(**streamlit.secrets[“snowflake”])
my_cur = my_cnx.cursor()
#queries the table
my_cur.execute(“select * from cloud_db.public.cc_form_results”)
my_data_rows = my_cur.fetchall()
streamlit.text(“Form table display success”)
#make it look like a dataframe
streamlit.dataframe(my_data_rows)
Once these changes are committed, you can see how the table is updated in the app. In this case, it shows like this (Reference Image 24).

Image 24: Snapshot of Streamlit application showing the table from Snowflake
The primary goal of the blog was to showcase the end-to-end process of building a web application using Snowflake, GitHub, Python, and Streamlit. By sharing our experiences and insights, we hope to provide readers with a comprehensive overview of the development process, from initial ideation and data integration to code implementation and user interface design. This blog serves as a valuable resource for anyone looking to create a similar project, offering a detailed roadmap of the tools and techniques needed to succeed.
*** This blog by our Data Engineer Sanjana Chalavadi showcases her experience building a simple app with Snowflake as part of her recent internship with us under the guidance of Piyush Malik
If you wish to learn more or need help with your Data Engineering , Data Science & Analytics projects, feel free to be in touch . We are glad to be of service.***